The November Key Ingredients Challenge: There's a modern homemaker in all of us, right? For our challenge this month, create something to spice up your kitchen, or anything featuring kitchen icons or food (food stamp images or real food!).
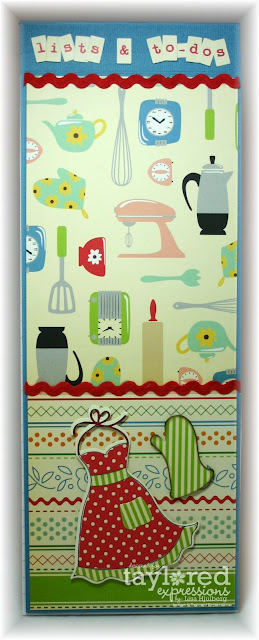
Haha, this is a funny challenge for me, who is NOT what you'd call a culinary queen. In fact, my husband does most of the cooking. I'm the one who makes reservations or phones in the take-out! lol But I've made a couple of things that I actually find handy in the kitchen. The first is a notepad! I need these to make shopping and honey-do lists!
My projects were made using the goodies in the November Key Ingredients Kit. The notepad is actually half of a standard paper pad, which Staples was happy to cut in two for me. I used cardstock to make the cover, which required a bit of scoring and piecing at the top since the pad is a bit taller that 11" and I wanted to completely cover the top, going over the edge and a few inches down on the back. The cardstock is scored just above the red rick-rack at the top so that the cover lifts easily in order to write on the paper inside.
The apron is from the brand new What's Cookin' stamp set (which I LOVE!)... I stamped it on Choice Buttercream cardstock, and then again on two different patterns of Modern Homemaker to paper piece the image. I die cut the apron using the Apron & Pocket Dies (which I also LOVE, along with the coordinating Kitchen Accessores dies).
The oven mitt is one of the many adorable chipboard pieces that come with the kit. I covered the chipboard with matching paper, sanded and inked around the edges.
Speaking of which, if you haven't discovered this already, the very best way to get a really finished look when you cover chipboard with patterned paper is to sand a bit after gluing the paper to the chipboard. The very best way I've found to do this is with the Precision File Set. I've had my set for years and can't do without it! It comes with very narrow files (including one that is circular) which allow you to get into the smallest nooks and crevices of your chipboard piece, such as the measuring cup in my next project.
Yep, I made a Cook-Book-Mark! I'm showing it off with one of my treasures, a first edition copy of Pillsbury's Best of the Bake-off Collection published in 1959. My mother handed this down to me, so it is extra special. Some of the patterned paper in October Afternoon's Modern Homemaker collection reminds me of the typeface in this cookbook, which you can see here.
I've marked the page of one of my all-time favorite cookie recipes... Peanut Blossoms. I'm thinking this must have been the origination of that now famous recipe entered in the Pillsbury Bake-Off more than 50 years ago.
As you can see, I used one of the "cookbook page" patterns, which I adhered to a piece of the Blossom cardstock, and then finished each edge at the top and bottom with some of the yellow ribbon in the kit. I stamped images from What's Cookin' in black ink right onto the patterned paper. After inking around the edges in brown, I slipped the bookmark into a plastic protective sleeve I found in my stash.
I covered three chipboard pieces (chef's hat, rolling pin and measuring cup) in Blossom cardstock on the backs and patterned paper on the front, then sanded and sponged with brown ink before punching a hole in each with my Crop-A-Dile. I threaded the finished pieces onto ribbon from the kit, tied them together in a knot at the top of the bookmark sleeve, and voila!
Taylor has once again compiled all of the Design Team (and her own) cards/projects into a handy guide with step-by-step instructions on how to recreate them yourself, which will be a FREE download for all Key Ingredients Subscribers! Woo hoo!!! If you weren't already a subscriber, now's the time! You won't be able to resist once you see all the "kitchen" goodness made by these amazing ladies:
Melody Rupple: A Paper Melody
Jen Tapler: Jen Tapler Designs
Lynn Put: The Queen's Scene
Jessica Diedrich: Yeah, She Stamps
Rosie Hughes: Love my Craft Room
and, of course, Taylor herself: Taylored Expressions
Jen Tapler: Jen Tapler Designs
Lynn Put: The Queen's Scene
Jessica Diedrich: Yeah, She Stamps
Rosie Hughes: Love my Craft Room
and, of course, Taylor herself: Taylored Expressions
Have a wonderful day, my friends!


5 comments:
Super cute To-Do List and bookmark Lisa!!! I really like the paper pieced apron and oven mitt on your to do list and the chipboard kitchen pieces on your bookmark are very fun!
Some of the best recipes come from the older cook books, it's so nice that you have this one that your mom gave you.
FABULOUS projects Lisa! And what a special keepsake you have! But I especially love the to-do list - I'm a sucker for all things "list"! LOL.
fantastic project, Lisa! love it!
Super cute list, Lisa! And I'm Mmmmm-ing over here at the sight of those peanut butter blossoms... YUM!
Great project Lisa!! I love the bookmark idea!
Post a Comment